How to Remove Junk Files on PCs with CCleaner Software [Review]
PC optimization is something we do from time to time. it can come in the form of disk fragmentation, virus scanning, registry cleaning and etc.
Honestly, i feel wistful whenever my PC performs slowly wh
Showing posts with label PC Tutorials. Show all posts
Showing posts with label PC Tutorials. Show all posts
Tuesday, July 17, 2018

Top 3 External Hard Disk Drives of 2018
Top 3 External Hard Disk Drives of 2018
Every time we try to replace an old hard disk or add a second one, we spend a certain amount of time for the installment. In Addition, we must first backup the information while flash drives don't always have enough storage space.
The most acceptable solution in this case will be - to buy an external 1 Tb hard disk drive. we bring to your attention the list and rating of the best external hard drives according to the result of our many test.
For the meantime, you can buy branded hardware such as: Hard disk drives, compact disk ROM driver, keyboard and etc from http://jiji.ng/computer-hardware
Shopping on Jiji is much cheaper, easier and gives more option for a good bargain. you can seize the opportunity to choose the most affordable price. Their search system comes with filters, fast communication with the sellers and a reliable protection from scammers!
Top 3 External Hard Disk Drives of 2018
Here comes the main part of today's discussion: Sharing the top 3 external HDDs that are making waves in tech stores.
They were chosen based on popular demand, positive buyer’s feedback, reliability and the many tests we carried out before coming up with this list
WD My Passport Ultra
The brand that has been tested with time. Offers different capacity options (500 Gb, 1 Tb, 1.5 Tb, 2Tb and 3 Tb), four color variations (black, blue, white and dark red) and excellent compatibility with
PC and Mac OS.
This external hard drive comes with three special utilities – WD Utility, WD Security (password protected) and WD Smart-Ware Pro ( Dropbox backup).
My Passport has support for USB 3.0/2.0. When USB 2.0 is connected, the read speed is 30 MB/s,
the write speed is 28 MB/s. When using USB 3.0 the speed is impressive: 118 MB/s – for reading
and 120 MB/s – for writing. The disc operates almost silently and it does not vibrate
Seagate Expansion
Seagate Expansion is available in 5 memory options: 500 GB, 1 TB, 2 TB, 3 TB and 4 TB. It has
support for USB 2.0 and USB 3.0 and uses the same port to transmit information and receive power.
With a speed of 5400 RPM, Expansion outperforms WD Passport Ultra and many other modern drives. During the tests the disk showed the following results: writing- 121 MB/s, reading – 129 MB/s. In my humble opinion, having a reliable 1TB Seagate expansion external drive is more economical than trying to upgrade the built-in drives in older machines.
Toshiba Canvio Connect II
Toshiba’s compact external hard drive Canvio Connect II (with model no. HDTC810XK3A1) features: a decent, reliable and highly efficient software tool (known as; Pogoplug PC and NTI Backup Now EZ).
The device is available in four versions of the built-in memory: 500GB, 1TB, 2TB and 3TB and in five colors – black, blue, red, white and white-gold. Canvio Connect has support for both USB 2.0 and USB 3.0. When transferring data via USB 3.0, the write speed is 100 MB/s, and the reading speed is 98 MB/s.
Wrap Up:
The large amount of memory, long operation, high speed of reading and writing from the disk, compactness and the ability to record information unlimited number of times are the main advantages of modern external hard drives that you should definitely take into account while choosing which model to buy. Indeed, there’s no such thing as too much space!
Do you have a thing or two ask about hard disk drives in general? Or needs our recommendation for the right external disk drives to buy? Use the comment section below to communicate same to us. We’ll try to respond to you not later than 48 hours.
Every time we try to replace an old hard disk or add a second one, we spend a certain amount of time for the installment. In Addition, we must first backup the information while flash drives don't always have enough storage space.
The most acceptable solution in this case will be - to buy an external 1 Tb hard disk drive. we bring to your attention the list and rating of the best external hard drives according to the result of our many test.
For the meantime, you can buy branded hardware such as: Hard disk drives, compact disk ROM driver, keyboard and etc from http://jiji.ng/computer-hardware
Shopping on Jiji is much cheaper, easier and gives more option for a good bargain. you can seize the opportunity to choose the most affordable price. Their search system comes with filters, fast communication with the sellers and a reliable protection from scammers!
Top 3 External Hard Disk Drives of 2018
Here comes the main part of today's discussion: Sharing the top 3 external HDDs that are making waves in tech stores.
They were chosen based on popular demand, positive buyer’s feedback, reliability and the many tests we carried out before coming up with this list
WD My Passport Ultra
The brand that has been tested with time. Offers different capacity options (500 Gb, 1 Tb, 1.5 Tb, 2Tb and 3 Tb), four color variations (black, blue, white and dark red) and excellent compatibility with
PC and Mac OS.
This external hard drive comes with three special utilities – WD Utility, WD Security (password protected) and WD Smart-Ware Pro ( Dropbox backup).
My Passport has support for USB 3.0/2.0. When USB 2.0 is connected, the read speed is 30 MB/s,
the write speed is 28 MB/s. When using USB 3.0 the speed is impressive: 118 MB/s – for reading
and 120 MB/s – for writing. The disc operates almost silently and it does not vibrate
Seagate Expansion
Seagate Expansion is available in 5 memory options: 500 GB, 1 TB, 2 TB, 3 TB and 4 TB. It has
support for USB 2.0 and USB 3.0 and uses the same port to transmit information and receive power.
With a speed of 5400 RPM, Expansion outperforms WD Passport Ultra and many other modern drives. During the tests the disk showed the following results: writing- 121 MB/s, reading – 129 MB/s. In my humble opinion, having a reliable 1TB Seagate expansion external drive is more economical than trying to upgrade the built-in drives in older machines.
Toshiba Canvio Connect II
Toshiba’s compact external hard drive Canvio Connect II (with model no. HDTC810XK3A1) features: a decent, reliable and highly efficient software tool (known as; Pogoplug PC and NTI Backup Now EZ).
The device is available in four versions of the built-in memory: 500GB, 1TB, 2TB and 3TB and in five colors – black, blue, red, white and white-gold. Canvio Connect has support for both USB 2.0 and USB 3.0. When transferring data via USB 3.0, the write speed is 100 MB/s, and the reading speed is 98 MB/s.
Wrap Up:
The large amount of memory, long operation, high speed of reading and writing from the disk, compactness and the ability to record information unlimited number of times are the main advantages of modern external hard drives that you should definitely take into account while choosing which model to buy. Indeed, there’s no such thing as too much space!
Do you have a thing or two ask about hard disk drives in general? Or needs our recommendation for the right external disk drives to buy? Use the comment section below to communicate same to us. We’ll try to respond to you not later than 48 hours.
Monday, July 16, 2018
How To Format a Laptop Completely
How To Format a Laptop Completely
Today i am going to show you how to completely format a laptop easily.
With the following steps you can format your lapto completely.
1ST METHOD
Reformatting your laptop with Installation CDs
If you have become frustrated with the performance of your laptop because of too many installed programs, an overgrown system registry or a malicious software infection, the fastest way to restore its original perfomance is with a complete hard drive format. However, this process is coplicated and can result in loss of data or inability to get your operating system and programs back if you forget a critical step. Confirm that you have all of the software needed to restore your computer, and then use your recovery disc or Window installation disc to format the hard drive and re-install Windows.
Step 1
Confirm that you have the Windows product key for your laptop. if you purchased the laptop with windows pre-installed, the Windows product key is generally on a sticker affixed to the bottom of the computer.
Step 2
Check that you have the ability to re-install Windows. you need a Windows installation disc or the recovery disc for your laptop. If your laptop did not include a physical disc, it stores the original system files on a hidden hard drive partition. Confirm that the partition works by pressing a keyboard shortcut displayed on the screen such as "F8" or "F10" during startup. Your computer should also include a utility allowing you to burn the system files on a recordable DVD.
Step 3
Check that you have all of the software and driver discs needed to install your programs and hardware device drivers. If you downloaded some of your software from the Internet, find the installation files and save them on a removable storage device.
Step 4
Back up all of the data on your laptop's hard drive. You can use a free program such as Clonezilla or DriveImage XML to clone the hard drive on an external drive. If you do not have a hard drive large enough to hold all of the data on your laptop, you can back up the most important files manually. However, formatting your laptop will remove this data. If you forget something, it will be difficult or impossible to recover.
Step 5
Insert the Windows or recovery disc, and restart your laptop. If you are using the hidden recovery partition, restart the laptop and immediately press the shortcut key displayed on the screen. Follow the instructions displayed on the screen to install Windows or perform a full system recovery, and return your laptop to its original state.
2ND METHOD
Reformatting a Laptop Using Restoration Partition
Step 1
Restart your computer. While the machine is rebooting, repeatedly press the F10 key on your keyboard until the machine boots. This will take you into the partition offering you options for repair or restore (reformatting and reloading).
Step 2
Select the option for installing a fresh system. The beauty of this system is that you don't have to do anything else. The restore partition will completely run the program to format, reload the OS, install drivers and install all of the original software that came with your laptop.
Step 3
Wait for the reformat to complete. This process will usually take around 30 minutes to complete.
In summary: you have successfully formatted your PCsimple and very easy
Today i am going to show you how to completely format a laptop easily.
With the following steps you can format your lapto completely.
1ST METHOD
Reformatting your laptop with Installation CDs
If you have become frustrated with the performance of your laptop because of too many installed programs, an overgrown system registry or a malicious software infection, the fastest way to restore its original perfomance is with a complete hard drive format. However, this process is coplicated and can result in loss of data or inability to get your operating system and programs back if you forget a critical step. Confirm that you have all of the software needed to restore your computer, and then use your recovery disc or Window installation disc to format the hard drive and re-install Windows.
Step 1
Confirm that you have the Windows product key for your laptop. if you purchased the laptop with windows pre-installed, the Windows product key is generally on a sticker affixed to the bottom of the computer.
Step 2
Check that you have the ability to re-install Windows. you need a Windows installation disc or the recovery disc for your laptop. If your laptop did not include a physical disc, it stores the original system files on a hidden hard drive partition. Confirm that the partition works by pressing a keyboard shortcut displayed on the screen such as "F8" or "F10" during startup. Your computer should also include a utility allowing you to burn the system files on a recordable DVD.
Step 3
Check that you have all of the software and driver discs needed to install your programs and hardware device drivers. If you downloaded some of your software from the Internet, find the installation files and save them on a removable storage device.
Step 4
Back up all of the data on your laptop's hard drive. You can use a free program such as Clonezilla or DriveImage XML to clone the hard drive on an external drive. If you do not have a hard drive large enough to hold all of the data on your laptop, you can back up the most important files manually. However, formatting your laptop will remove this data. If you forget something, it will be difficult or impossible to recover.
Step 5
Insert the Windows or recovery disc, and restart your laptop. If you are using the hidden recovery partition, restart the laptop and immediately press the shortcut key displayed on the screen. Follow the instructions displayed on the screen to install Windows or perform a full system recovery, and return your laptop to its original state.
2ND METHOD
Reformatting a Laptop Using Restoration Partition
Step 1
Restart your computer. While the machine is rebooting, repeatedly press the F10 key on your keyboard until the machine boots. This will take you into the partition offering you options for repair or restore (reformatting and reloading).
Step 2
Select the option for installing a fresh system. The beauty of this system is that you don't have to do anything else. The restore partition will completely run the program to format, reload the OS, install drivers and install all of the original software that came with your laptop.
Step 3
Wait for the reformat to complete. This process will usually take around 30 minutes to complete.
In summary: you have successfully formatted your PCsimple and very easy
Friday, July 13, 2018
Converting your MSD to NTFS
Converting your MSD to NTFS
Your hard drive must be formatted with a file system such as FAT, FAT32 or NTFS so that windows can be installed on to it. This system determines how files are named, organised and stored on the drive. if you're not using it already, NTFS (New Technology File System) is recommended for Windows because of the additional functionality it offers. If your PC came with Window Pre-Installed then there's a chance that you're already NTFS. If you have Upgraded from from window 98 or me you may still be using fat or FAT32.
The option to change over to NTFS would have been available during the upgrade process. Don't worry if you skipped this as it's possible to convert at any time from within windows without losing any data.
The recommended option
there are number of features in window XP that will only work if the NTFS file system is present, which is why it's suggested you make use of it. file and folder permissions, encryption and privacy options are just some of those you'll be able to access. in particular , those of you who have set up user accounts will find NTFS unavailable. For instance, if you continue to use FAT or FAT32 anyone with physical access to the drive will be able to access the files and folders that are stored there. However, with NTFS you'll be able to use a level of encryption (professional Edition Only) that will enable you to protect your data.
You'll also fid NTFS more reliable in that it's more able to recover from disk errors that its FAT or FAT32 counterparts. A Log of all disk activity is kept so should a crash occur, window XP can use this information to repair the file system when your PC boots up again. To find out what file system yo're using, open my computer, right click your main hard drive and choose properties. Take a look at the General tab to see confirmation of the file system that's in use.
Convert Now
You can use the convert tool in Window XP to change the file system on your hard disk from FAT or FAT 32 to NTFS. The whole process is safe an your existing data won't be destroyed. To begin Click start -> Run, type CMD and press enter. at the CMD type convert C: /fs:ntfs and pres enter (where 'c' is the letter of the drive you're converting). when you try and run the convert utility, it's likely that Window xp WILL BE USING YOUR PAGING FILE SO the process won't be completed immediately. therefore, you'll see a brief message on screen informing you that the conversion will take place instead the next time widow starts up. Having restarted, the check disk utility will run, the conversion will be performed automatically and you may fine that your PC will reboot twice more.
The Benefits
With YOUR DRIVE NOW RUNNING ntfs, IT'S TIME TO TAKE ADVANTAGE OF THE NEW OPTIONS THAT AVAILABLE. having CREATED A NUMBER OF DIFFERENT USER ACCOUNTS YOU CAN NOW CONTROL the level of access that's granted to individuals users. for example, there are going to be certain files and folders that you'll want some users to be able to acess but not others. if you have Window XP professional Edition you can do this immediately.
Right click any file or folder, choose properties and select the security tab. a dialog will be displayed showing the names of all the users. Alongside will be two columns which enables you to select levels of access for each of them, the permissions include, full control, modify, read and write. you can then check the appropriate box to determine whether or not to allow or deny a particular permission. For window XP home Edition users, the security tab wont be immediately available. To access this option you'll need to restart your PC, pressing [F8] until a menu appears. Next select safe mode and wait for the XP to start up. Yo can then set your option in the same way.
Another features is NTFS compression
Its quick and seamless as your file or folder is decompressed automatically when you access it. (don't confuse this with a ZIP compression utility where the files need to be extracted before they can be accessed). Although you may have used NTFS conpression on a file or folder, there's no way of telling just b looking at it. to remedy this, open my computer, click tools -. folder option and select the view tab. Under advanced settings, scroll down and check the option 'Show encrypted or compressed NTFS in color', then click apply and ok. Take a look at your compressed items in My Computer and you'will see the text label has changed from black to blue. Something else that's exclusive to professional Edition users is the Encrypting File System (EFS). You can use this to protect your important data so that no one else can read it. Your encrypted files and folders will only be accessible when you have logged int your user account successfully.
Your hard drive must be formatted with a file system such as FAT, FAT32 or NTFS so that windows can be installed on to it. This system determines how files are named, organised and stored on the drive. if you're not using it already, NTFS (New Technology File System) is recommended for Windows because of the additional functionality it offers. If your PC came with Window Pre-Installed then there's a chance that you're already NTFS. If you have Upgraded from from window 98 or me you may still be using fat or FAT32.
The option to change over to NTFS would have been available during the upgrade process. Don't worry if you skipped this as it's possible to convert at any time from within windows without losing any data.
The recommended option
there are number of features in window XP that will only work if the NTFS file system is present, which is why it's suggested you make use of it. file and folder permissions, encryption and privacy options are just some of those you'll be able to access. in particular , those of you who have set up user accounts will find NTFS unavailable. For instance, if you continue to use FAT or FAT32 anyone with physical access to the drive will be able to access the files and folders that are stored there. However, with NTFS you'll be able to use a level of encryption (professional Edition Only) that will enable you to protect your data.
You'll also fid NTFS more reliable in that it's more able to recover from disk errors that its FAT or FAT32 counterparts. A Log of all disk activity is kept so should a crash occur, window XP can use this information to repair the file system when your PC boots up again. To find out what file system yo're using, open my computer, right click your main hard drive and choose properties. Take a look at the General tab to see confirmation of the file system that's in use.
Convert Now
You can use the convert tool in Window XP to change the file system on your hard disk from FAT or FAT 32 to NTFS. The whole process is safe an your existing data won't be destroyed. To begin Click start -> Run, type CMD and press enter. at the CMD type convert C: /fs:ntfs and pres enter (where 'c' is the letter of the drive you're converting). when you try and run the convert utility, it's likely that Window xp WILL BE USING YOUR PAGING FILE SO the process won't be completed immediately. therefore, you'll see a brief message on screen informing you that the conversion will take place instead the next time widow starts up. Having restarted, the check disk utility will run, the conversion will be performed automatically and you may fine that your PC will reboot twice more.
The Benefits
With YOUR DRIVE NOW RUNNING ntfs, IT'S TIME TO TAKE ADVANTAGE OF THE NEW OPTIONS THAT AVAILABLE. having CREATED A NUMBER OF DIFFERENT USER ACCOUNTS YOU CAN NOW CONTROL the level of access that's granted to individuals users. for example, there are going to be certain files and folders that you'll want some users to be able to acess but not others. if you have Window XP professional Edition you can do this immediately.
Right click any file or folder, choose properties and select the security tab. a dialog will be displayed showing the names of all the users. Alongside will be two columns which enables you to select levels of access for each of them, the permissions include, full control, modify, read and write. you can then check the appropriate box to determine whether or not to allow or deny a particular permission. For window XP home Edition users, the security tab wont be immediately available. To access this option you'll need to restart your PC, pressing [F8] until a menu appears. Next select safe mode and wait for the XP to start up. Yo can then set your option in the same way.
Another features is NTFS compression
Its quick and seamless as your file or folder is decompressed automatically when you access it. (don't confuse this with a ZIP compression utility where the files need to be extracted before they can be accessed). Although you may have used NTFS conpression on a file or folder, there's no way of telling just b looking at it. to remedy this, open my computer, click tools -. folder option and select the view tab. Under advanced settings, scroll down and check the option 'Show encrypted or compressed NTFS in color', then click apply and ok. Take a look at your compressed items in My Computer and you'will see the text label has changed from black to blue. Something else that's exclusive to professional Edition users is the Encrypting File System (EFS). You can use this to protect your important data so that no one else can read it. Your encrypted files and folders will only be accessible when you have logged int your user account successfully.
"ENLIGHTENMENT"
Wednesday, July 11, 2018
Fix Xamp (port 80 in use by "unable to open process" with PID 4)
Fix Xamp (port 80 in use by "unable to open process" with PID 4)
Open a CMD prompt and type in command: net stop /y
Run dialog Box (Press keys Win+R) .... Then type Services.msc
Then Scrolled down to: World Wide Web Publishing Service, Double clicked on it and click STOP (If the service status is started
3. Start Apache Again with XAMPP
hope its helpful
Open a CMD prompt and type in command: net stop /y
Run dialog Box (Press keys Win+R) .... Then type Services.msc
Then Scrolled down to: World Wide Web Publishing Service, Double clicked on it and click STOP (If the service status is started
3. Start Apache Again with XAMPP
hope its helpful
Formatting an HDD, when Fdisk wont't
Formatting an HDD, when Fdisk wont't
This is my favorite way to wipe my HDD clean:
CAUTION: this debug script is for advanced users only. its purposes is to remove all formatting and partitioning information from your HDD when Fdisk is Unable to do so. THIS WILL REMOVE ALL DATA AND PROGRAMS FROM THE DRIVE.
1. create a MSDOS bood disk with Debug
2. At Dos Command propmpt types the following: Debug [Enter] (where enter is to press enter key)
NOTE: type the following bolded text only. you will receive an error if you type anything other than the bold text. the non-bolded text represent what will appear on your screen once you press. [Enter] after each command
-F 200 L1000 0 [Enter]
-A CS:100 [Enter]
xxxx:0100 MOV AX, 301 [Enter]
xxxx:0103 MOV BX, 200 [enter]
xxxx:0106 MOV CX, 1 [enter]
xxx:0109 MOV DX, 80 [enter]
NOTE: (---"80" for hd0, "81" for hd1)
xxxx:010c INT 13 [enter]
xxx: 010e INT 20 [enter]
xxx: 0110 [enter]
-G [enter]
"program terminated Normally"
3. Turn of the computer. on the next startup the HDD will need to be partitioned and formatted
This is my favorite way to wipe my HDD clean:
CAUTION: this debug script is for advanced users only. its purposes is to remove all formatting and partitioning information from your HDD when Fdisk is Unable to do so. THIS WILL REMOVE ALL DATA AND PROGRAMS FROM THE DRIVE.
1. create a MSDOS bood disk with Debug
2. At Dos Command propmpt types the following: Debug [Enter] (where enter is to press enter key)
NOTE: type the following bolded text only. you will receive an error if you type anything other than the bold text. the non-bolded text represent what will appear on your screen once you press. [Enter] after each command
-F 200 L1000 0 [Enter]
-A CS:100 [Enter]
xxxx:0100 MOV AX, 301 [Enter]
xxxx:0103 MOV BX, 200 [enter]
xxxx:0106 MOV CX, 1 [enter]
xxx:0109 MOV DX, 80 [enter]
NOTE: (---"80" for hd0, "81" for hd1)
xxxx:010c INT 13 [enter]
xxx: 010e INT 20 [enter]
xxx: 0110 [enter]
-G [enter]
"program terminated Normally"
3. Turn of the computer. on the next startup the HDD will need to be partitioned and formatted
Downloading Window Media Streams
Downloading Window Media Streams
HI,
I am going to show you how to Dolwoad from Windows Media Streams
Just follows the steps Below
Steps
Look for the videos source url in the web-page source code and copy it
To view the source code, right Click on the webpage that plays the video and select "view source". If unable to do so, just close the window and in the main internet Explorer (IE) window, click the history icon or pres ctrl+H. look for the same webpage on the left pane. on the menu, click View > view Source.
Paste the video source url in windows Media Player. (File > open url...)
lets the video play now. when the correct title appears on the playlist pane, right click on it and select "propertied."
Select the source url and copy it:
Paste the url in flash-get to download the video clip.
"Enlightenment"
HI,
I am going to show you how to Dolwoad from Windows Media Streams
Just follows the steps Below
Steps
Look for the videos source url in the web-page source code and copy it
To view the source code, right Click on the webpage that plays the video and select "view source". If unable to do so, just close the window and in the main internet Explorer (IE) window, click the history icon or pres ctrl+H. look for the same webpage on the left pane. on the menu, click View > view Source.
Paste the video source url in windows Media Player. (File > open url...)
lets the video play now. when the correct title appears on the playlist pane, right click on it and select "propertied."
Select the source url and copy it:
Paste the url in flash-get to download the video clip.
"Enlightenment"
Delete Files from The Recent File List In Windows
Delete Files from The Recent File List In Windows
Hi,
I am going to show you to delete recent files on your pc WMP .
This tip requires a change to the Window Registry. Please see the MSFN Guide "Backup Your Registry" if you are new to window registry.
Windows Media Player (WMP) is a built-in application that allows you to play Multimedia files. Like many other applications, WMP remembers the most recently played files and displays them in the recent file list under the the file menu. This feature is useful if you regularly play certain files, but you may want to clear the list if you share the computer and a user account or create archives and CDs.
There are two ways you can clear the list
I. The ClearMRU.exe Utility is available for free in the windows media player pack from Mcrosoft
II. You can also Manually delete the list through the Windows Registry:
1. Start the Windows Registry Editor, Regedit.exe, by typing regedit in the windows run Command Line
2. Go to HKEY_CURRENT_USER\Software\Microsoft\Player\RecentFileList.
3. Delete the RecentFileList Subkey
4. If you've also streamed content from the internet, you can delete the RecentURLList subkey
5.Exit the Registry Editor
Hi,
I am going to show you to delete recent files on your pc WMP .
This tip requires a change to the Window Registry. Please see the MSFN Guide "Backup Your Registry" if you are new to window registry.
Windows Media Player (WMP) is a built-in application that allows you to play Multimedia files. Like many other applications, WMP remembers the most recently played files and displays them in the recent file list under the the file menu. This feature is useful if you regularly play certain files, but you may want to clear the list if you share the computer and a user account or create archives and CDs.
There are two ways you can clear the list
I. The ClearMRU.exe Utility is available for free in the windows media player pack from Mcrosoft
II. You can also Manually delete the list through the Windows Registry:
1. Start the Windows Registry Editor, Regedit.exe, by typing regedit in the windows run Command Line
2. Go to HKEY_CURRENT_USER\Software\Microsoft\Player\RecentFileList.
3. Delete the RecentFileList Subkey
4. If you've also streamed content from the internet, you can delete the RecentURLList subkey
5.Exit the Registry Editor
" below for enlightenment"
Delete and Undeletable files on PC
Delete and Undeletable files on PC
Hello,
Many complain of unable to delete some files in the PC. So i am set to show you how to forcibly delete them.
Follow this steps gradually
STEPS
Open A command prompt Window and leave it open (CMD)
Close all open programs
Click start, Rung and Enter TASKMGR.EXE
Go to the process tab and end process on Explorer.exe
Leave task Manager open
Go back to the CMD and change to the directory the undeletable file is located in.
At the CMD type DEL <Filename> where <filename> is the file you wish to delete.
Go back to the Task Manger, Click file, New Task and enter Explorer.EXE to restart the GUI Shell
Close the Task Manger
or Your Can Try This
Open Notepad.exe
Click>Save As..>
locate the folder where your undelatable file is
Choose 'All files' from the file type BOX
Click once on the file you want to delete so its name appears in the 'filename' box
Put a " at the start and end of the filename
(the filename should have the extension of the undeletable file so it will overwrite it)
Click save,
it should ask you to overwrite the existing file, choose yes and you can delete it as normal
Here's a manual way of doing it. i'll take this off once you put into your effort.
1. Start
2. Run
3. Type: command
4. To move into a directory type: cd:\*** (the stars stand for your folder)
5. if you cannot access the folder because it has spaces for example "program files or Techlighthub files flder" you have to do the following. instead of typing in the full folder name only take the first 6 letters then put a ~ and then 1 without spaces. example: cd:\progra~1\Techli~ 1
6. once you are in the folder the non-deletable file it in type dir - a list will come up with everything inside the folder
7. now to delete the file type in del***.bmp, txt,pgh,etc... and if the file name has spaces you would use the specail 1st 6 letters followed by a ~ and a 1 rule. example: If your file name was bad file.bmp you would type once into the specific folder through command, del badfil~1.bmp and your file should be gone. Make sure to type in the correct extension.
Hello,
Many complain of unable to delete some files in the PC. So i am set to show you how to forcibly delete them.
Follow this steps gradually
STEPS
Open A command prompt Window and leave it open (CMD)
Close all open programs
Click start, Rung and Enter TASKMGR.EXE
Go to the process tab and end process on Explorer.exe
Leave task Manager open
Go back to the CMD and change to the directory the undeletable file is located in.
At the CMD type DEL <Filename> where <filename> is the file you wish to delete.
Go back to the Task Manger, Click file, New Task and enter Explorer.EXE to restart the GUI Shell
Close the Task Manger
or Your Can Try This
Open Notepad.exe
Click>Save As..>
locate the folder where your undelatable file is
Choose 'All files' from the file type BOX
Click once on the file you want to delete so its name appears in the 'filename' box
Put a " at the start and end of the filename
(the filename should have the extension of the undeletable file so it will overwrite it)
Click save,
it should ask you to overwrite the existing file, choose yes and you can delete it as normal
Here's a manual way of doing it. i'll take this off once you put into your effort.
1. Start
2. Run
3. Type: command
4. To move into a directory type: cd:\*** (the stars stand for your folder)
5. if you cannot access the folder because it has spaces for example "program files or Techlighthub files flder" you have to do the following. instead of typing in the full folder name only take the first 6 letters then put a ~ and then 1 without spaces. example: cd:\progra~1\Techli~ 1
6. once you are in the folder the non-deletable file it in type dir - a list will come up with everything inside the folder
7. now to delete the file type in del***.bmp, txt,pgh,etc... and if the file name has spaces you would use the specail 1st 6 letters followed by a ~ and a 1 rule. example: If your file name was bad file.bmp you would type once into the specific folder through command, del badfil~1.bmp and your file should be gone. Make sure to type in the correct extension.
"Enlightenment"
Create One-Click Shutdown And Reboot Shortcuts
Create One-Click Shutdown And Reboot Shortcuts
Hello,
Today i am going to show you how to easily shutdown, reboot, and log off your PC.
First, create a shortcut on your desktop by Right clicking on the desktop, choosing New, and then Choosing Shortcut.
The create shortcut Wizard appears. in the box asking for the location of the shortcut, type shutdown. after you create the shortcut, double-clicking on it will shout down our PC.
But you can do much more with a shutdown shortcut than mere shut down your PC. you can add any combination of several switches to do extra duty, like this
shutdown -r -t 01 -c (rebooting your PC"
Double clicking on that shortcut will reboot your PC. " the shutdown command includes a variety of switches you can use to customize it.
Below are list of all the customization and their use
i use this technique to create two shutdown shortcuts on my desktop - one for turning offf my pc, and one for rebooting. here are the ones i use:
shutdown -s -t 03 -c "Bye Bye Techlighthub!"
shutdown -r -t 03 -c "Ill be Back Techlighthub" ;) !"
SWITCHES
What it does
-s
shuts down the PC
-l
Logs off the current user
-t nn
indicates the duration of delay, in seconds, before performing the action
-c "Messagetext"
Display a message in the system shutdown window. A maximum of 127 character can be used. the message must be enclosed in quotation marks.
-f
Forces any running application to shutdown
-r
reboots the PC.
"Enlightenment"
Hello,
Today i am going to show you how to easily shutdown, reboot, and log off your PC.
First, create a shortcut on your desktop by Right clicking on the desktop, choosing New, and then Choosing Shortcut.
The create shortcut Wizard appears. in the box asking for the location of the shortcut, type shutdown. after you create the shortcut, double-clicking on it will shout down our PC.
But you can do much more with a shutdown shortcut than mere shut down your PC. you can add any combination of several switches to do extra duty, like this
shutdown -r -t 01 -c (rebooting your PC"
Double clicking on that shortcut will reboot your PC. " the shutdown command includes a variety of switches you can use to customize it.
Below are list of all the customization and their use
i use this technique to create two shutdown shortcuts on my desktop - one for turning offf my pc, and one for rebooting. here are the ones i use:
shutdown -s -t 03 -c "Bye Bye Techlighthub!"
shutdown -r -t 03 -c "Ill be Back Techlighthub" ;) !"
SWITCHES
What it does
-s
shuts down the PC
-l
Logs off the current user
-t nn
indicates the duration of delay, in seconds, before performing the action
-c "Messagetext"
Display a message in the system shutdown window. A maximum of 127 character can be used. the message must be enclosed in quotation marks.
-f
Forces any running application to shutdown
-r
reboots the PC.
"Enlightenment"
Tuesday, July 10, 2018
Acronyms You need to Know on Computer
Acronyms You need to Know on Computer
We keep seeing acronym (Short Word) we don't know in computer so today i am going to show you the meaning of some Acronyms which are as follows
----A-----
ADSL - Asymmetric Digital Subscriber Line
AGP - Accelerated Graphic Port
ALI - Acer Labs, Incoporated
ALU - Arithmetic Logic Unit
AMD - Advanced Micro Device
APC - American Power Conversion
ASCII - American Standard Code for Information Interchange
ASIC - Advanced Specific Integrated Circuit
AT - Advanced technology
ATI - Advanced Technology Inc.
ATX - Advanced Technology Extended
----B-----
BFG - BFG Technologies
BIOS - Basic Input Output System
BNC - Barrel Nut Connector
-----C------
CAS - Column Address Signal
CD - Compact Disk
CDR - Compact Disk Recorder
CDRW - Compact Disk Re-Writer
CD-ROM - Compact Disk - Read Only Memory
CFM - Cubic Feet Minute
CMOS - Complementary Metal Oxide Semiconductor
CPU - Central Processing Unit
-----D------
DDR - Double Data Rate
DDR-SDRAM - Double data Rate - Synchronous Dynamic Random Access Memory
DIMM - Dual Inline Memory Module
DRAM - Dynamic Random Access Memory
DPI - Dot Per Inch
DVD - Digital Versatile Disc
DVD-RAM - Digital Versatile Disk -Random Access Memory
----E-----
ECC - Error Correction Code
ECS - Elite Computer Systems
EDO - Extended Data Out
EEPROM - Electrical Erasable programmable Read-Only Memory
---F---
FCPGA - Flip Chip Pin Grid Array
FDC - Floppy Disk Controller
FDD - Floppy Disk Drive
FPS - Frame Per Second
FPU -- Floating Point Unit
FSAA - Full Screen Anti-Aliasing
FS - For Sale
FSB - Front Side Bus
----G----
GB - Gigabytes
GBPS - Gigabytes Per Second
GDI - Graphical Device Interface
GHZ - HigaHertz
----H-----
HDD - Hard Disk Drive
HIS - Hightech Information System
HP - Hewlett - Packard
HSF - Heat Sink Fan
----I-------
IBM - International business Machine
IC - Integrated Circuit
IDE - Integrated Drive Electronics
IFS - Item For Sale
IRQ - Interrupt Request
ISA - Industry Standard Architecture
ISO - Intenational standard Organization
----J-----
----K----
KBps - Kilobytes Per Second
------L------
LAN - Local Area Network
LCD - Liquid Crystal Display
LDT - Lightening Data Transport
LED - Light Emitting Diode
----M----
MAC - Media Access Control
MBps - MegaBytes Per second
MHz - MegaHertz
MIPS - Million Instructions Per Second
MMX - Multi - Media Extensions
MSI - Micro Star International
----N----
NAS - Network Attached Storage
NAT - Network Address Translation
NIC - Network Interface Card
--- O ---
OC - Overclock (Over Clock)
OCZ - OCZ Technology
OEM - Original Equipment Manufacturer
--- P ---
PC - Personal Computer
PCB - Printed Circuit Board
PCI - Peripheral Component Interconnect
PDA - Personal Digital Assistant
PCMCIA - Peripheral Component Microchannel Interconnect Architecture
PGA - Professional Graphics Array
PLD - Programmable Logic Device
PM - Private Message / Private Messaging
PnP - Plug 'n Play
PNY - PNY Technology
POST - Power On Self Test
PPPoA - Point-to-Point Protocol over ATM
PPPoE - Point-to-Point Protocol over Ethernet
PQI - PQI Corporation
PSU - Power Supply Unit
--- R ---
RAID - Redundant Array of Inexpensive Disks
RAM - Random Access Memory
RAMDAC - Random Access Memory Digital Analog Converter
RDRAM - Rambus Dynamic Random Access Memory
ROM - Read Only Memory
RPM - Revolutions Per Minute
--- S ---
SASID - Self-scanned Amorphous Silicon Integrated Display
SCA - SCSI Configured Automatically
SCSI - Small Computer System Interface
SDRAM - Synchronous Dynamic Random Access Memory
SECC - Single Edge Contact Connector
SODIMM - Small Outline Dual Inline Memory Module
SPARC - Scalable Processor Architecture
SOHO - Small Office Home Office
SRAM - Static Random Access Memory
SSE - Streaming SIMD Extensions
SVGA - Super Video Graphics Array
S/PDIF - Sony/Philips Digital Interface
--- T ---
TB - Terabytes
TBps - Terabytes per second
Tbps - Terabits per second
TDK - TDK Electronics
TEC - Thermoelectric Cooler
TPC - TipidPC
TWAIN - Technology Without An Important Name
--- U ---
UART - Universal Asynchronous Receiver/Transmitter
USB - Universal Serial Bus
UTP - Unshieled Twisted Pair
--- V ---
VCD - Video CD
VPN - Virtual Private Network
--- W ---
WAN - Wide Area Network
WTB - Want to Buy
WYSIWYG - What You See Is What You Get
--- X ---
XGA - Extended Graphics Array
XFX - XFX Graphics, a Division of Pine
XMS - Extended Memory Specification
XT - Extended Technology
We keep seeing acronym (Short Word) we don't know in computer so today i am going to show you the meaning of some Acronyms which are as follows
----A-----
ADSL - Asymmetric Digital Subscriber Line
AGP - Accelerated Graphic Port
ALI - Acer Labs, Incoporated
ALU - Arithmetic Logic Unit
AMD - Advanced Micro Device
APC - American Power Conversion
ASCII - American Standard Code for Information Interchange
ASIC - Advanced Specific Integrated Circuit
AT - Advanced technology
ATI - Advanced Technology Inc.
ATX - Advanced Technology Extended
----B-----
BFG - BFG Technologies
BIOS - Basic Input Output System
BNC - Barrel Nut Connector
-----C------
CAS - Column Address Signal
CD - Compact Disk
CDR - Compact Disk Recorder
CDRW - Compact Disk Re-Writer
CD-ROM - Compact Disk - Read Only Memory
CFM - Cubic Feet Minute
CMOS - Complementary Metal Oxide Semiconductor
CPU - Central Processing Unit
-----D------
DDR - Double Data Rate
DDR-SDRAM - Double data Rate - Synchronous Dynamic Random Access Memory
DIMM - Dual Inline Memory Module
DRAM - Dynamic Random Access Memory
DPI - Dot Per Inch
DVD - Digital Versatile Disc
DVD-RAM - Digital Versatile Disk -Random Access Memory
----E-----
ECC - Error Correction Code
ECS - Elite Computer Systems
EDO - Extended Data Out
EEPROM - Electrical Erasable programmable Read-Only Memory
---F---
FCPGA - Flip Chip Pin Grid Array
FDC - Floppy Disk Controller
FDD - Floppy Disk Drive
FPS - Frame Per Second
FPU -- Floating Point Unit
FSAA - Full Screen Anti-Aliasing
FS - For Sale
FSB - Front Side Bus
----G----
GB - Gigabytes
GBPS - Gigabytes Per Second
GDI - Graphical Device Interface
GHZ - HigaHertz
----H-----
HDD - Hard Disk Drive
HIS - Hightech Information System
HP - Hewlett - Packard
HSF - Heat Sink Fan
----I-------
IBM - International business Machine
IC - Integrated Circuit
IDE - Integrated Drive Electronics
IFS - Item For Sale
IRQ - Interrupt Request
ISA - Industry Standard Architecture
ISO - Intenational standard Organization
----J-----
----K----
KBps - Kilobytes Per Second
------L------
LAN - Local Area Network
LCD - Liquid Crystal Display
LDT - Lightening Data Transport
LED - Light Emitting Diode
----M----
MAC - Media Access Control
MBps - MegaBytes Per second
MHz - MegaHertz
MIPS - Million Instructions Per Second
MMX - Multi - Media Extensions
MSI - Micro Star International
----N----
NAS - Network Attached Storage
NAT - Network Address Translation
NIC - Network Interface Card
--- O ---
OC - Overclock (Over Clock)
OCZ - OCZ Technology
OEM - Original Equipment Manufacturer
--- P ---
PC - Personal Computer
PCB - Printed Circuit Board
PCI - Peripheral Component Interconnect
PDA - Personal Digital Assistant
PCMCIA - Peripheral Component Microchannel Interconnect Architecture
PGA - Professional Graphics Array
PLD - Programmable Logic Device
PM - Private Message / Private Messaging
PnP - Plug 'n Play
PNY - PNY Technology
POST - Power On Self Test
PPPoA - Point-to-Point Protocol over ATM
PPPoE - Point-to-Point Protocol over Ethernet
PQI - PQI Corporation
PSU - Power Supply Unit
--- R ---
RAID - Redundant Array of Inexpensive Disks
RAM - Random Access Memory
RAMDAC - Random Access Memory Digital Analog Converter
RDRAM - Rambus Dynamic Random Access Memory
ROM - Read Only Memory
RPM - Revolutions Per Minute
--- S ---
SASID - Self-scanned Amorphous Silicon Integrated Display
SCA - SCSI Configured Automatically
SCSI - Small Computer System Interface
SDRAM - Synchronous Dynamic Random Access Memory
SECC - Single Edge Contact Connector
SODIMM - Small Outline Dual Inline Memory Module
SPARC - Scalable Processor Architecture
SOHO - Small Office Home Office
SRAM - Static Random Access Memory
SSE - Streaming SIMD Extensions
SVGA - Super Video Graphics Array
S/PDIF - Sony/Philips Digital Interface
--- T ---
TB - Terabytes
TBps - Terabytes per second
Tbps - Terabits per second
TDK - TDK Electronics
TEC - Thermoelectric Cooler
TPC - TipidPC
TWAIN - Technology Without An Important Name
--- U ---
UART - Universal Asynchronous Receiver/Transmitter
USB - Universal Serial Bus
UTP - Unshieled Twisted Pair
--- V ---
VCD - Video CD
VPN - Virtual Private Network
--- W ---
WAN - Wide Area Network
WTB - Want to Buy
WYSIWYG - What You See Is What You Get
--- X ---
XGA - Extended Graphics Array
XFX - XFX Graphics, a Division of Pine
XMS - Extended Memory Specification
XT - Extended Technology
Change Your IP IN Less than a Minute
Change Your IP IN Less than a Minute
Most people will be wandering if it is possible to change PC IP address. Let me tell you today YES it is very possible and i am going to show you how to to that.
STEPS
1. Click on "Start" in the bottom hand of screen
2. Click on "run"
3. Types in "Command" and hit ok
You should be at an MS-DOS prompt screen (CMD)
4. Type "ipconfig /release" Just like that without quote just like that and hit "enter"
5. type "exit" and leave the prompt
6. right click on "Network Places" or "My Network Places" on your desktop or Press "Win+E" then Locate My network
7. click on "properties"
You show now be on a screen with something titled "Local Area Connection", or something close to that, if you have a network hooked up, all of your other networks.
8. Right click on "Local Area Connection" and click "properties"
9. Double click on the "Internet Protocol (TCP/IP)" from the list under the "General" tab
10. Click on "Use the following IP address " under the "General" tab
11. Create an IP address (it doesn't matter what it is. i just type 1 and 2 until i fill the area up)
12. press "tab" and it should automatically fill in the "subnet Mask" section with default numbers.
13. Hit the "OK" button here
14. Hit the "OK" button again
you should now be back to the "Local Area Connection" screen.
15. right click back on "Local Area Connection" and go to the properties again
16. Go back to the "TCP/IP" settings
17. This Time, select "obtain an IP address automatically" an Hit "OK"
19. Hit "OK" again
20. You now have a new IP address
With Little Practice, You can easily get this process done in 15 seconds.
NOTE: this only changes your dynamic IP address, not your ISP/IP address.
if you plan on blasting a website with his trick be extremely careful, because if they try a little, they can trace it back.
"enlightenment"
Most people will be wandering if it is possible to change PC IP address. Let me tell you today YES it is very possible and i am going to show you how to to that.
STEPS
1. Click on "Start" in the bottom hand of screen
2. Click on "run"
3. Types in "Command" and hit ok
You should be at an MS-DOS prompt screen (CMD)
4. Type "ipconfig /release" Just like that without quote just like that and hit "enter"
5. type "exit" and leave the prompt
6. right click on "Network Places" or "My Network Places" on your desktop or Press "Win+E" then Locate My network
7. click on "properties"
You show now be on a screen with something titled "Local Area Connection", or something close to that, if you have a network hooked up, all of your other networks.
8. Right click on "Local Area Connection" and click "properties"
9. Double click on the "Internet Protocol (TCP/IP)" from the list under the "General" tab
10. Click on "Use the following IP address " under the "General" tab
11. Create an IP address (it doesn't matter what it is. i just type 1 and 2 until i fill the area up)
12. press "tab" and it should automatically fill in the "subnet Mask" section with default numbers.
13. Hit the "OK" button here
14. Hit the "OK" button again
you should now be back to the "Local Area Connection" screen.
15. right click back on "Local Area Connection" and go to the properties again
16. Go back to the "TCP/IP" settings
17. This Time, select "obtain an IP address automatically" an Hit "OK"
19. Hit "OK" again
20. You now have a new IP address
With Little Practice, You can easily get this process done in 15 seconds.
NOTE: this only changes your dynamic IP address, not your ISP/IP address.
if you plan on blasting a website with his trick be extremely careful, because if they try a little, they can trace it back.
"enlightenment"
How to Change The Default Location for Installing Apps on PC
How to Change The Default Location for Installing Apps
As the sizes of hard drives increase, more people are using partitions to separate and store groups of files.
So therefore i am going to show you How to Change The Default Location for Installing Apps.
PC uses the C:\Programs files directory as the default base director into which new programs are installed. however, you can change the default location of installation drive and/ or directory by using a registry hack.
STEPS
Open the Registry Editor by using (win+R) and then type REGEDIT
It will display the Registry Editor for you and go to
HKEY_LOCAL_MACHINE\SOFTWARE\Microsoft\Windows\CurrrentVersion
look for the value named ProgramFilesDir. By default, this value will be C:\Program Files.
Edit the value to any valid drive or Folder and Windows will use that new location as the default installation directory for new programs.
Use the Images below for more Clarification
"for more Enlightenment"
How to Burn a .bin file Without a .cue file
How to Burn a .bin file Without a .cue file
To burn a bin file, you will need an appropriate cue file.
You do exactly the same as for iso files, but when you click on "burn image," you don't browse to the bin itself, but instead to the cue file, and you open that one.
when the writer starts to burn, it will automatically search for bin file and start burning it, in fact, the cue file tells the burning program where it can fine the bin file that is attached to it. it is very important that you use the right cue file when you burn a bin. i.e. both cue and bin files that are attached to each other must be located in the same folder, and every bin file has it's own cue file.
Normally, when you download a bin fie, you can download the appropriate cue file as well. if you do not have the cue file (or feel bold) you can make the cure file yourself which is really easy to do:
- Open Notepad
- copy the following text into notepad:
FILE"nameofimage"BINARY
TRACK 01 MODE1/2352
INDEX 01 00:00:00
Where name of imge.bin is the name of the bin file you want to burn.
3. The rest is easy: just save the notepad text with the on of the bin, but with cue extension.
4. the file should be save in the same folder as its appropriate bin file and should be something like myfile.cue
"Enlightenment"
Monday, July 9, 2018
How to Zoom In A pc
How to Zoom In A PC

Hello!! today am going to teach you how to zoom in a pc, many people find it difficult to use computer because of the tiny witting on it especially the old people.
Can't See well No problem,
STEPS
Below are pictorial guides for the steps:


Hello!! today am going to teach you how to zoom in a pc, many people find it difficult to use computer because of the tiny witting on it especially the old people.
Can't See well No problem,
STEPS
- Go to menu search magnifier
- Select the size of the magnification
- And you are good to go
Below are pictorial guides for the steps:


Sunday, July 8, 2018
How to Add OS Users through CMD
How to Add OS Users through CMD

There may come a time in which you need to manage user accounts via parental controls or to disable one, and you have no access to the control panel. This experience may be frustrating, s b read on to find out how you can restore access to the control panel.
This cool experience is what am going to show you
Pictorial images Showing Steps by Steps of How to Add OS Users through CMD


There may come a time in which you need to manage user accounts via parental controls or to disable one, and you have no access to the control panel. This experience may be frustrating, s b read on to find out how you can restore access to the control panel.
This cool experience is what am going to show you
Pictorial images Showing Steps by Steps of How to Add OS Users through CMD
1

2

3

4

5

6

7

8

"Hope this is helpful. comment for inquiry"
How to Partition Your Hard Drive In Window 7
How to Partition Your Hard Drive In Window 7

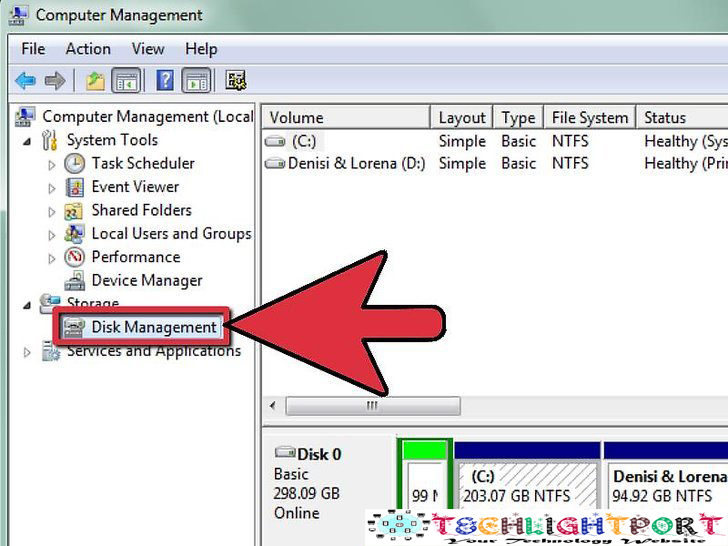
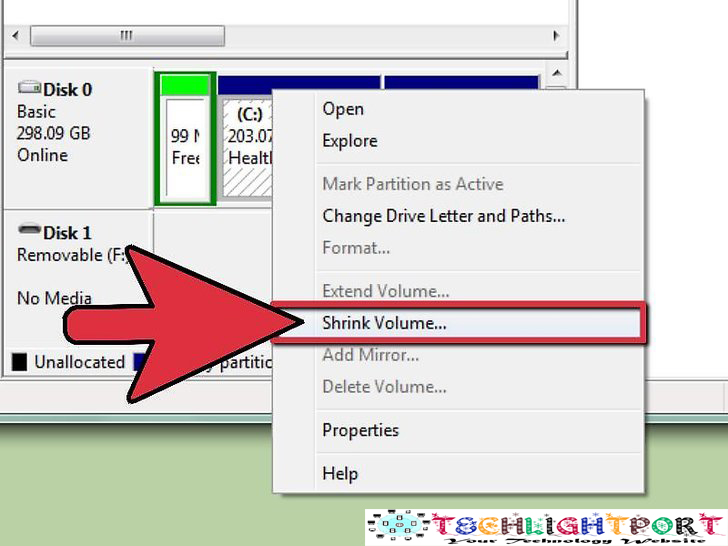
Therefore, i am going to show you How to Partition Your Hard Drive In Window 7 this methods which also work on other windows.
Here are pictorial guides to show you How to Partition Your Hard Drive
1.


Disk partitioning is to divide the hard drive into multiple logical units. people don't often choose to partition their hard disk, but it has many benefits. mainly, by partitioning your disk, you can separate tour operating system from your data and thus reduces the chances of data becoming corrupted. even if you format your OS, your data would still be safe and sound. and many many more importance attached to it.
Therefore, i am going to show you How to Partition Your Hard Drive In Window 7 this methods which also work on other windows.
Here are pictorial guides to show you How to Partition Your Hard Drive
1.

2
3
4

5

6

7

8

9

10

11

12

"Hope it Helps for any problem or inquiry please comment below"
HOW TO OPEN REGEDIT
HOW TO OPEN REGEDIT
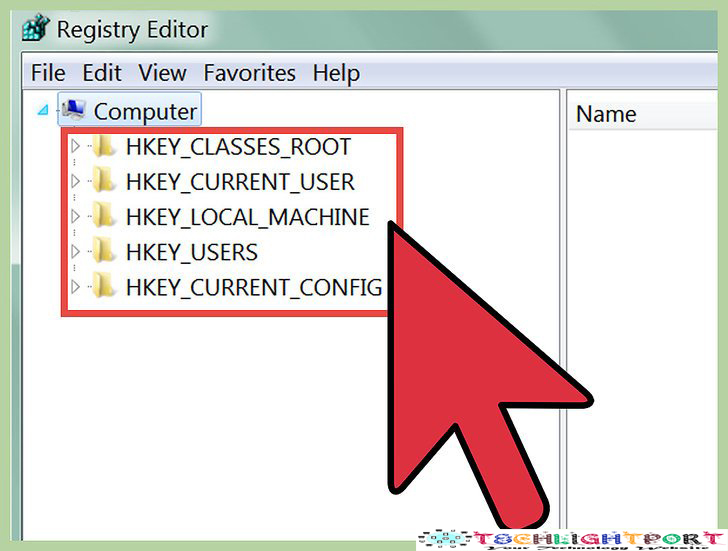
Hello, i am going to show you how to open regedit (registry edit)
the windows registry is a database that stores settings and options for Microsoft Windows operating systems.
it contains information and settings for hardware, operating system software , most non-operating system software, and per-user settings.
the registry also provides a window into the operation of the kernel, exposing runtime information such as performance counters and currently active hardware.
you can use the registry editor to make changes to your computers registry entries, which can be useful for hardware troubleshooting and virus removal.
Below are Steps by Steps Pictorial Guides that will guide you in opening REGEDIT
1.


4.


Hello, i am going to show you how to open regedit (registry edit)
the windows registry is a database that stores settings and options for Microsoft Windows operating systems.
it contains information and settings for hardware, operating system software , most non-operating system software, and per-user settings.
the registry also provides a window into the operation of the kernel, exposing runtime information such as performance counters and currently active hardware.
you can use the registry editor to make changes to your computers registry entries, which can be useful for hardware troubleshooting and virus removal.
Below are Steps by Steps Pictorial Guides that will guide you in opening REGEDIT
1.

2.

3

5.

6.

7.

8.

9.

10.

11.

12.

"Hope it helps" pls comment below"
How to Copy Files Using Command Prompt
How to Copy Files Using Command Prompt
Hello! Today Am going to teach you how to copy your files using cmd in the computer.
Meanwhile there will be only few word in this tutorial, but a "VIVID" pictorial guide will be given to you.
Sometimes people find it difficult to copy file using normal copier. here comes the ease of the copying for you or should i say an alternative for the copying of your files easily.
Steps to Copying using CMD


Hello! Today Am going to teach you how to copy your files using cmd in the computer.
Meanwhile there will be only few word in this tutorial, but a "VIVID" pictorial guide will be given to you.
Sometimes people find it difficult to copy file using normal copier. here comes the ease of the copying for you or should i say an alternative for the copying of your files easily.
Steps to Copying using CMD
- type "CD" followed by a space in CMD, but don't press "enter" yet
- Type the name of the directory your file is located in.
- Press "Enter".
- type "copy" followed by a space, but don't press "enter."
- Type your file name followed by a space, but don't press "enter"
- type in the name of the directory you want to copy the files to
- press "enter" to copy the file.
HERE ARE THE STEPS BY STEPS PICTORIAL GUIDE
1.

2.

3.

4.

5.

6.

7.

8.

9.

10.

11.

12.

13.

14.

15.

16.

17.

"Hope it is useful!! for enquirers, troubleshoot, or problem, please use the comment box below thanks"
Subscribe to:
Posts (Atom)